


There are so many things you can do to improve your crocheting. Whether its getting rid of that unsightly bump when you bind off after working in the round or simply having to weave in your ends after completing about a million color changes. With these 7 tips and tricks becoming a better crocheter will happen in no time.
Weaving Your Ends As You Go
Weaving in your ends could be the most annoying and time consuming part of your project. To me it’s so tedious that always I avoided beautiful projects that require to many color changes. But once I decided to take the plunge and try and complete my first graphghan, I decided that weaving in my ends at the end was not going to go over well. So it was time to weave as I go. Weaving in your ends as you go is a great way to eliminate breaking out that yarn needle at the end of your project. Weaving in your ends as you go is so simple and worth it. If you just lay the ends across the unworked stitches and crochet like you normally would right over them it saves so much time. Though in the short term it might slow you down a bit it so much better than having to go back and do it all in the end.
How to Join a Long Series of Chains
Chain 102 then without twisting your chain join with a SS to the first chain made. To some that general start of a project might be familiar. Until I learned a fool proof way on how join a long chain without twisting it, I would let myself get all the way to round two or three before I even noticed that I twisted my chain in the very beginning. I couldn’t begin to express how frustrating it is to have to frog your project right when you finally get the motion of the pattern down.
Then one day, a friend showed me a little fool proof trick to prevent this from happening. If you chain about three inches worth of chains and then put that first chain that you made at the end of your hook once you complete all your chains you can just yarn over and pull through everything on the hook. Its so much easier not to twist 20 or so chains, rather then 102 of them.
For the video tutorial on how to join with a slip stitch without twisting your chain, Click Here.
Seamless Edge

Making your beginning chain have a seamless edge makes it look just like the last row. What I mean by this is both loops of the chains are visible at the beginning of your crochet project. To do this, instead of working directly into the chain, you are going to work in the back bump located behind each chain stitch. This technique really makes a difference.
For the video tutorial on how to create a seamless edge, Click Here.
Magic ring
The Magic Ring or Magic Circle method is used to eliminate the starting hole when doing projects like hats or granny squares that are worked in the round. When I first learn how to work in the round, I would chain 4 and join with a slip stitch to the first chain made. After that I would work my round 1 into the ring created by the ch 4. This method would always leave a little hole in the center of my work. To do away with that little hole I learned how to make the magic ring. Using the magic ring completely got rid of that gap and made the crochet project have a better finish.
To learn how to make the the Magic Ring, Click Here, to watch the tutorial video.
Invisible Join
The invisible join is an amazing technique to know how to do. It can be frustrating to have that little bump that occurs when binding of. Whether you are making a coaster or an infinity Scarf you can use the invisible join technique to rid your self of this uneven look. This tip helps make each crochet project more professional by creating a seamless and smooth finish. I don’t think that I will ever bind off the same way again. See more HERE!
Learn To Read Crochet Charts

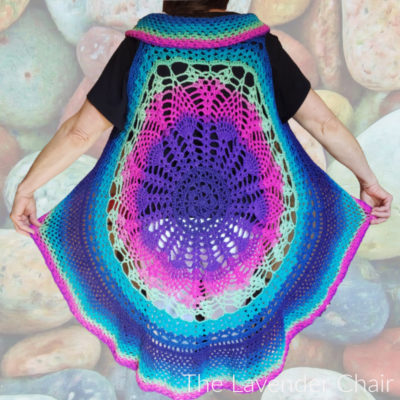
While Scrolling through Pinterest I have noticed that some of the best and most eye catching patterns are either written in Russian or Chinese. If only it were as simple as copying and pasting the patterns into google translate. Though most of these amazing patterns are written in a different language, 90% of them have a graph associated with them (sometimes it’s only the chart.). Learning how to read these crochet charts can help you tackle masterpieces that you wouldn’t normally be able to make. You can learn How To Read Crochet Charts with a detailed pictorial provided in the link. This pictorial gives a step by step explanation on how to to break down and start working on crochet charts.
Decreasing The Size of Holes On Your Double Crochet Projects
There are several ways that you can decrease the size of the holes made in your Dc project. Here are three of my favorite methods that I alternate based on my crochet project.
The alternate double crochet turning chain is used to keep the holes on either side of your Dc projects at bay.
To see how to make this stitch, you can watch the video tutorial.
- Chain 2 Method
The Chain 2 Method is exactly how it sounds. When you reach the end of your Dc row, instead of chaining 3 then turning, try chaining only 2. After you chain 2, continue as you would normally.
- DC Directly Above Last Stitch Made
This method is by far the best of the three listed. After you have completed your first row of DC chain 2 or 3, turn your work and Dc directly on top of the last stitch from the previous round (usually this stitch is skipped.). Now when you come to the end of your row DO NOT work into the turning chain space. Repeat this process over and over until you have reached the desired length of your crochet project. The reason that I prefer this method the most is because unlike the Chain 2 Method, it gets rid of the holes completely and unlike the Alternative Double Crochet Turning Chain method, you are left with a nice straight edge.
Flawless Yarn Joining Method
You know my top three pet peeves when dealing with fiber arts? Weaving in ends, Unsightly knots, and joins that come apart. Though these things might not be in you top three pet peeves, they’d still be nice to eliminate.
I can’t remember where I saw this yarn joining method, but, it’s way too perfect not to share.
Sadly, not all crochet projects are one skein projects. So, at some point you are going to have to rejoin a new skein. That’s where the flawless yarn join comes in. This flawless yarn join, really is flawless. It doesn’t leave behind any ends to weave in nor does it leave behind a completely unsightly knot. Best of all , it is the most secure yarn joining method that I have ever used.